egonzinc
Brigade Commander
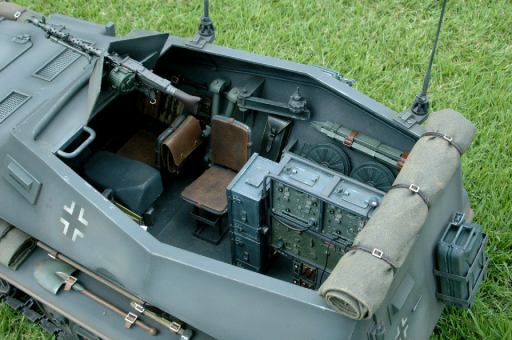
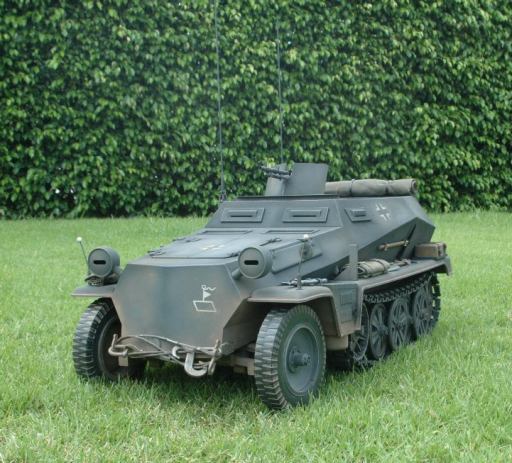
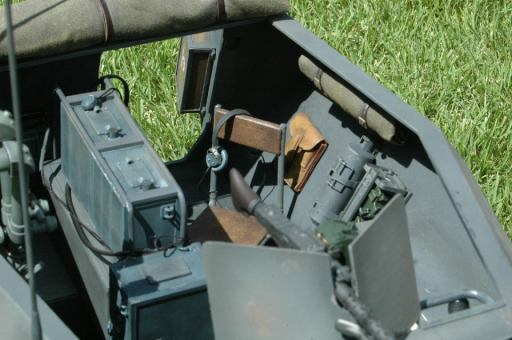
250/3 Leichter Funkpanzerwagen
Command vehicle for Panzer Division.
Panzer Battalion HQ
Russian Front, 1941-1943
This vehicle represents a command car for an armored unit. It is somewhat generic although the tactical markings are for a vehicle in the HQ section of a Panzer Battalion.
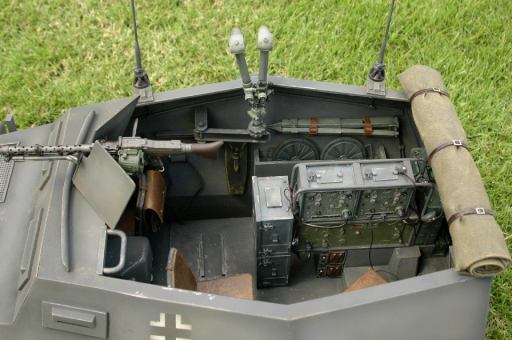
These 250/3 would be adapted to fit the needs of the mission and this one has an array of three radios. All of the equipment incuded in the interior is made to suit the requirements of the units commanding officer.
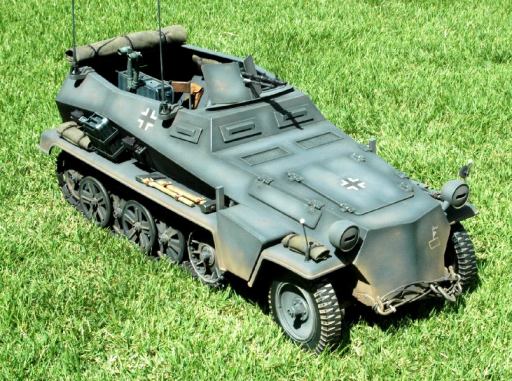
Antenna(an incredibly detailed piece that with the rubber base even wobbles like the prototype!), fire extinguisher and jerrycan holders and tow cable and hardware from Mike Stannard (1/6 Icon/ toyrific)
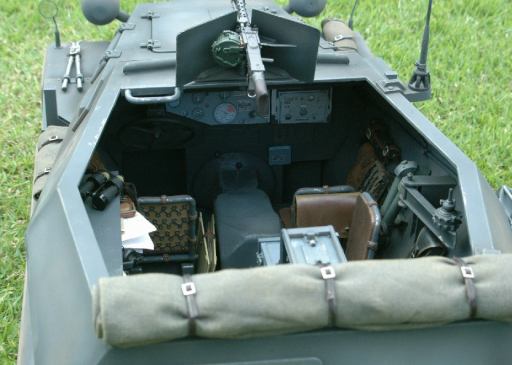
Dashboard details are simply printed and size adjusted from the post by Sixty Driver of David’s(Jagdpanther) 250 posted on this forum. Should have darkened the copy a bit, to make it blend better…
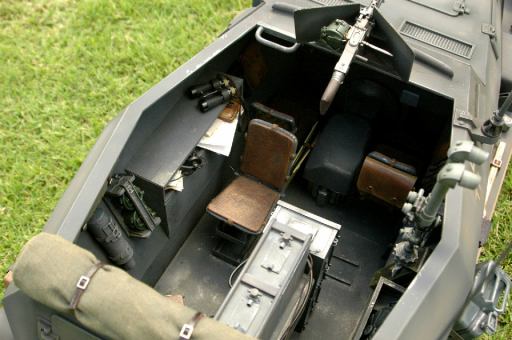
Seats and MG34 gun shield from Armorpax. Placed the jump seat on a modified wheel axle piece from a discarded TUS sidecar, so the seat swivels which makes it easier to get it out of the vehicle as it swivels out of way. Also placed a regular seat on a Mike Stannard jerry can holder, making a sort of “rumble seat” which can be placed in two areas, in three positions. The seat can be set up just like the drivers seat, in the same position but facing backwards or on the side under the range finder swing arm
Long range radio from John(veritas).Two small radios from the radio set figures from Dragon. Used two radios and used the other pieces as accessories to the radios.
Scratchbuilt the bullet catch from a piece of curved styrene tube.
Removed the extra frame around the visors. Replaced the front piece with the visors to lower the position of the front facing visors. Also placed styrene piece inside to make it look neater from the inside.
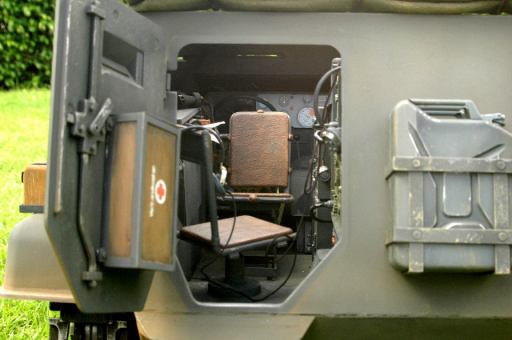
Many detail parts from Steve’s(panzerwerks) fine menu of 250 detailed parts, including the tranny cover ( I made something out of styrene for the actual transmission and made the shift levers from wire and sculpy for the knobs), tranny interior bell, wheel hub set, front wheel hub cover and the correcting rim,steering wheel, muffler trapezoid on port side, tool box on starboard side, turn markers, front fender lane markers, rear door latch, first aid box,
Some of the tools from the armorpax metal tool set and others from the parts box(shovel and pick). Made straps with buckles from the parts box and Rio Rondo leather lace.
Made a scratchbuilt swing arm for the “rabbit ears” range finder. This piece is from the DML Rommel figure. I placed the piece’s tripod legs inside the vehicle, strapped with Rio Rondo leather. Made the jack block and base out of balsa and an extra piece from one of the radios.
MG shield from Toyrific and MG34 from parts box.
Made several tarps with heavy cloth, using buckles from the parts box and Rio Rondo leather lace.
There are several equipment pieces inside the vehicle, various map cases, an MP40, MP40 ammo pouch, Luger holster, MG drum ammo and the holding bracket, MG tool kit, wire cutter pouch, a couple of mines, LG ammo canister, Grenade case, a place to store the rabbit ears when not in use, placed a converted recently released leather pouch in the rear of the front starboard.
Made a “chin piece” for underneath the rear door out of styrene.
Added some styrene tube to the inside to represent the wiring from the antenna to the radios.
Made a couple of storage bins from styrene for the interior. One of them serves as a small map table on the port side of the vehicle, the other on the rear of the opposite side serves to store some equipment, now has a couple of mines.
Lots of paint chips in the interior in places where you would expect wear.
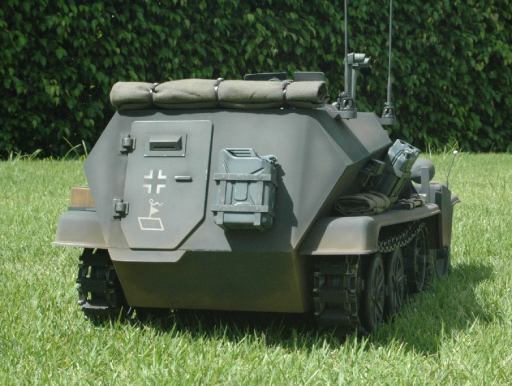
Vehicle painted German Grey, adding a German Grey lighter and darker shade and Flat Earth to add depth. Also added several colors dry-brushing(Buff,Flat Earth, Brown).
Decals are from John’s Stuff as were the tactical signs. I painted over the tactical insignia as the interior of the parallelogram frosted a bit, also painted freehand to represent this particular insignia adding a couple of elements. Did not want to add a divisional insignia to make it generic for diorama/photo shoots.
The many posts in the SAG forum were very helpful in figuring out how to place some of the custom pieces and several images from the internet provided inspiration for some of the details.
I also found the post that talked about moving the rear axle, a little late but in time to get it fixed! I also added some thin styrene to the parts in the friont suspension as a lot of it is visible from the front. Removed most of the bolts and bolt plastic posts from the hull and filled with an AB Epoxy, plastic like product called Quickplastic and some putty. The hull pieces fitted well for the most part but removing the bolts and the posts, made it tricky to align. I left the top hull piece off until the last step. That was not my initial plan. I usually build the piece then paint it, here the undersides were finished before the interior got started. I finished all the bits and pieces separately and then added to the interior, and to the fenders and side of the hull in the exterior.

Command vehicle for Panzer Division.
Panzer Battalion HQ
Russian Front, 1941-1943
This vehicle represents a command car for an armored unit. It is somewhat generic although the tactical markings are for a vehicle in the HQ section of a Panzer Battalion.
These 250/3 would be adapted to fit the needs of the mission and this one has an array of three radios. All of the equipment incuded in the interior is made to suit the requirements of the units commanding officer.
Antenna(an incredibly detailed piece that with the rubber base even wobbles like the prototype!), fire extinguisher and jerrycan holders and tow cable and hardware from Mike Stannard (1/6 Icon/ toyrific)
Dashboard details are simply printed and size adjusted from the post by Sixty Driver of David’s(Jagdpanther) 250 posted on this forum. Should have darkened the copy a bit, to make it blend better…
Seats and MG34 gun shield from Armorpax. Placed the jump seat on a modified wheel axle piece from a discarded TUS sidecar, so the seat swivels which makes it easier to get it out of the vehicle as it swivels out of way. Also placed a regular seat on a Mike Stannard jerry can holder, making a sort of “rumble seat” which can be placed in two areas, in three positions. The seat can be set up just like the drivers seat, in the same position but facing backwards or on the side under the range finder swing arm
Long range radio from John(veritas).Two small radios from the radio set figures from Dragon. Used two radios and used the other pieces as accessories to the radios.
Scratchbuilt the bullet catch from a piece of curved styrene tube.
Removed the extra frame around the visors. Replaced the front piece with the visors to lower the position of the front facing visors. Also placed styrene piece inside to make it look neater from the inside.
Many detail parts from Steve’s(panzerwerks) fine menu of 250 detailed parts, including the tranny cover ( I made something out of styrene for the actual transmission and made the shift levers from wire and sculpy for the knobs), tranny interior bell, wheel hub set, front wheel hub cover and the correcting rim,steering wheel, muffler trapezoid on port side, tool box on starboard side, turn markers, front fender lane markers, rear door latch, first aid box,
Some of the tools from the armorpax metal tool set and others from the parts box(shovel and pick). Made straps with buckles from the parts box and Rio Rondo leather lace.
Made a scratchbuilt swing arm for the “rabbit ears” range finder. This piece is from the DML Rommel figure. I placed the piece’s tripod legs inside the vehicle, strapped with Rio Rondo leather. Made the jack block and base out of balsa and an extra piece from one of the radios.
MG shield from Toyrific and MG34 from parts box.
Made several tarps with heavy cloth, using buckles from the parts box and Rio Rondo leather lace.
There are several equipment pieces inside the vehicle, various map cases, an MP40, MP40 ammo pouch, Luger holster, MG drum ammo and the holding bracket, MG tool kit, wire cutter pouch, a couple of mines, LG ammo canister, Grenade case, a place to store the rabbit ears when not in use, placed a converted recently released leather pouch in the rear of the front starboard.
Made a “chin piece” for underneath the rear door out of styrene.
Added some styrene tube to the inside to represent the wiring from the antenna to the radios.
Made a couple of storage bins from styrene for the interior. One of them serves as a small map table on the port side of the vehicle, the other on the rear of the opposite side serves to store some equipment, now has a couple of mines.
Lots of paint chips in the interior in places where you would expect wear.
Vehicle painted German Grey, adding a German Grey lighter and darker shade and Flat Earth to add depth. Also added several colors dry-brushing(Buff,Flat Earth, Brown).
Decals are from John’s Stuff as were the tactical signs. I painted over the tactical insignia as the interior of the parallelogram frosted a bit, also painted freehand to represent this particular insignia adding a couple of elements. Did not want to add a divisional insignia to make it generic for diorama/photo shoots.
The many posts in the SAG forum were very helpful in figuring out how to place some of the custom pieces and several images from the internet provided inspiration for some of the details.
I also found the post that talked about moving the rear axle, a little late but in time to get it fixed! I also added some thin styrene to the parts in the friont suspension as a lot of it is visible from the front. Removed most of the bolts and bolt plastic posts from the hull and filled with an AB Epoxy, plastic like product called Quickplastic and some putty. The hull pieces fitted well for the most part but removing the bolts and the posts, made it tricky to align. I left the top hull piece off until the last step. That was not my initial plan. I usually build the piece then paint it, here the undersides were finished before the interior got started. I finished all the bits and pieces separately and then added to the interior, and to the fenders and side of the hull in the exterior.